Showing posts with label Interior ideas. Show all posts

10 Benefits of Himalayan Salt Lamps


Have ya'll heard of Himalayan salt lamps? Well if you have not heard of Himalayan salt lamps they are pretty much natural Himalayan salt rocks with a light bulb placed inside of it.  For Christmas I bought myself a Himalayan salt lamp for more ambiance in my room but then I realized that Himalayan salt lamps actually have benefits. So I thought I would go over the benefits in this post! 

Himalayan Salt Lamp Benefits
1) Enhance overall breathing
So to start out there are these things called Cilia that are hairs that line the windpipe. Cilia act as microscopic breathing filters. Based on studies positive ions decrease cilial activity and negative ions increase cilial activity. The negative ions have a more positive effect on your breathing and Himalayan salt lamps actually release negative ions and it is believed that Himalayan salt lamps can actually help you breathe better. 

2)Purify and cleanse air
Himalayan salt lamps can help filter the air by attracting water molecules and other particles in the air and the Himalayan salt lamp actually absorbs the molecules. This is also called Hygroscopy if you want to look it up. This process is known to remove any gross particles and molecules from the air and it makes the air quality better in that area. 

3)Raise energy levels
Positive ions make your energy levels go down but since Himalayan salt lamps release negative ions your energy levels actually go up. Fun Fact: This is why Himalayan salt lamps are commonly used when it comes to energy healing because your energy increases with Himalayan salt lamps.

4)Enhance mood
The negative ions from the Himalayan salt lamp can help increase serotonin in your brain which actually improves your mood and energy levels.  

5)Helps you relax and decrease stress
Himalayan salt lamps omit a soft glow that can actually reduce your stress and help you relax. The glow acts as chromotherapy and actually puts you in a relaxing mood. The glow from the Himalayan salt lamp is also known to balance emotional, spiritual, and emotional energies. 

6)Improve Sleep
When you are overly exposed to positive ions it reduces the brain's blood and oxygen supply which makes it harder to sleep. So by having the negative ions from the Himalayan salt lamp it is proven to increase the brain's blood and oxygen supply and make it easier to fall asleep. 

7)Balance out Electromagnetic Radiation
Whether you believe it or not all of our devices have Electromagnetic radiation. EM radiation releases positive ions into the air constantly. EM radiation can cause fatigue, stress, a weak immune system, and the list goes on. But the nice thing is that Himalayan Salt lamps actually cancel out the positive ions and release negative ions which can prevent static buildup.  

8)Reduce Asthma 
This one goes along with improving your breathing. Himalayan Salt lamps filter the air and remove all the gross particles and molecules from the air. By having a Himalayan salt lamp it is said that it can reduce asthma since the air will be a better quality. 

9)Boost Blood flow
Studies find that negative ions can help improve blood flow and Himalayan salt lamps omit negative ions so the lamps could increase blood flow.

10)Increase Performance
There was a cool study where people had to complete a fourty minute task on the computer and they were exposed to negative ions. After the end of the fourty minutes it was found that when they were exposed to negative ions it reduced stress and anxiety. It also increased their performance. The reason why this happened was because negative ions increase blood and oxygen supplies in the brain and then in turn increase performance. 

Now that's all the benefits! A lot of the benefits were due to the negative ions the Himalayan salt lamp omits. Now don't y'all want to get one, I love them! Who knew a lamp could have so many benefits. Thanks for visiting my blog, I'll see you guys soon!


My Summer Room Tour


Hey guys it is a tradition for me to post a summer room tour every summer on my blog so to continue with the tradition I am here to share with you guys my summer room tour. Now my room isn't the most pinteresty room or anything but to me it's awesome. To start out with I have my bed which you can see in the image above. I have a queen bed and white duvet covers. I always keep two blankets underneath my covers because I love blankets even in the summer. I am such a pillow girl too so I have lots of pillows on my bed. 


Next we have my dresser. I just have a DIY garland that I made strung across the dresser. On my dresser I have my blue tooth speaker as well as two candles, some seashells, a container to put my chapstick and essential oils in, my water bottle, and a plant. I like to keep it pretty minimal because I love the clean look of it. Then inside the drawer I have basic stuff like socks, and clothes. 


Now on to my mirror area. I have a mirror that I use to check my outfit every time I go out. I also have a bamboo laptop desk from songmics.com and I have been loving it! It is totally my style and I love the color of the bamboo. I use it in bed when I'm on my laptop, or if my friends are over I use it as a little dropping point where they can put their stuff, and I also use it for drinks when I'm in bed watching stuff. 


This is a closeup of the bamboo laptop desk. What is also really cool about it is that it can fold up and you can take it anywhere with you. 


It also has a pull out drawer that you could use to put your keys in or some gum, whatever small items you can find! 


Now on to the left side of my room. I have my "nightstand". It's not really a nightstand but I think it's really cool. I just put two wooden blocks together, added a lamp, and a picture of me and my best friend and the "night stand" was completed. I like the natural vibe that it gives off. Next to the night stand I have my magazine bin where I throw all the magazines that I get from the mail in. I honestly don't know why I get so many fashion magazines in the mail but I just chuck them all in that little bin. Then next to the bin I have my boogie board! Your girl is kind of a water junkie so I have to always have a boogie board on hand, plus it looks really cool in my room too! 


Now I know this is crazy but I have a trampoline in my room. I like to bounce on it from time to time and I really have it there just to have it there. I mean who doesn't want a trampoline in their room? For real guys it's fun to have in my room just in case I want to bounce on it while I listen to some good music. 


Now this is the right side of my room. I have a plant and a comfy bean bag. I always find myself sitting on the floor because of the bean bag. In the picture the bean bag looks big but it's really not that big. I just have a kid sized bean bag and then I covered it with my comforter so then there is more plush to it. 


Also on the right side of my room I have two windows that I always keep open because I love the natural light. Between those windows I have some wall space and I hung this fish that I got from the Outer Banks. This fish is adorable and I love the little pattern on it. This fish was also only six bucks which is a really good deal for a wall hanging thing like this. 


Now on to my closet!! This is the outside of my closet. I have some of my favorite hats hanging from the knobs of the door. I also made this beachy styled collage and I just hung everything on the left side of my closet. This collage will probably change soon through because I want to create a collage of all of my friends, and all the good times this summer that I took pictures of. My plan for the collage I want to create is to have little quotes and sayings that describe me, photos of me and my friends together, cool nature photos I've taken, and photos of me and my boyfriend! I'm still trying to plan out the collage but I will see if I end up doing it on my closet. 


Lastly this is the inside of my closet. It looks a bit messy but that's because there is a lot of stuff I throw in this closet to make the rest of my room look clean lol. To briefly go into it I have my workout clothes on the left side of my closet, and my regular clothing on the right side of my closet. I have all of my shoes in here, and all of my bags. On the top of my bookshelf I keep all my running awards for cross country, and track. I keep my cold weather clothes in the white bin at the top shelf, and pretty much with that I just change out the clothing based on season. So all my warm weather clothes are hanging in my closet, and all my cold weather clothes are in the basket right now but once it's cold out I will change it so the warm weather clothing are in the basket. If you also didn't notice I color code everything for a cleaner look, and it makes it easier to pick out what you want to wear. In the nightstand I keep all of my beauty products like lotions, perfume, all of that. I like having that kind of stuff in my closet because the bathroom is already jammed full of products, and it makes it easier to get ready in the morning. Now this closet could be a whole other blog post but I'll wrap it up now. I think you guys get the general idea of it, and I will see you guys on Tuesday with another blog post. 

Thanks to Songmics for sponsoring this post! 


Some Room Updates


Hello guys I'm back with another "At Home with Sugarcoatedbears" post today. It has been a while since i have done a post in my "At Home with Suagrcoatedbears" series so I'm glad to be adding to the collection with today's post. This post will be a bit short because i just wanted to just show you guys some room updates since i have taken my Christmas decorations down. To start out with i got a new white pillow on my bed from Target. My dog chewed up two of the pom poms on my white pom pom pillow so i decided to get a new pillow. In the picture the small rectangle pillow is the one i got. It feels so nice, and i love the texture of it. 


Next up i got this canvas print from Photowall. They were kind enough to send me this canvas print for free, in exchange for a mention of their site on my blog. So they are a canvas, and wallpaper company located in Sweden. They have a list of designers who collaborate with them for their prints, and if you don't like their designs you can import your own image to be printed on a canvas. I did my own image because there is this fashion illustrator named Blair Breitenstein that i really like, and i wanted one of her prints. You can check out her work here, here work is very creative, and has a high fashion vibe. Before i placed my order for the canvas print i was a little bit skeptical of how it would turn out since it was an image but it turned out great. It almost looks as if it was the original painting, you can't really tell by the photo because i took all of the pictures for this post when the lightning was bad, but up close it looks great. If you're going to do an image print at Photowall i would just make sure you resize the photo to be big enough for your canvas print. So if you want a giant canvas make the image size giant, or if you want a medium size print do around a 500 x 400 image size. I recommend Photowall if you're looking for something easy, and reasonable. They are located in Sweden but the shipping was incredibly fast, like I'm talking one week. They also have a variety of different designs, so i bet you could find a design from them that you would like because they have a bunch of options. I would like to thank them again for sending me the canvas print, and contributing to the "At Home with Sugarcoatedbears" series. You can get 20% off your order for the next 20 days with the coupon code CourtneyHardyCampaign2018. When i first started this series it was funny because i was looking for brands to collab with for this series, and no one got back to me, and now i got my first collab for this series. So big thanks!!! 


This is my dresser, nothing has changed much other than that i changed my garland back to the tassel garland, and that i took off the Christmas decorations. Also if you're looking at the picture thinking of my uneven tassels it's just because I'm not too great at DIY's. 


On my dresser i now have this speaker that i got for Christmas. I got the Ultimate Ears Wonderboom speaker. It is a portable blue tooth speaker with wonderful sound quality, and it's also water-proof. I was wanting a speaker for a while, and now i have one that is up my ally. I love pink if you have not noticed already. 


I am keeping out my Christmas deer pillow a bit longer because it's super cute and it looks wintery, so i can still have it out for the winter months. I have it sitting on my mini bean bag, and i'm actually laying on it right now while i'm typing this. 


I added a new addition to this area of my room, i added a mini pantry. I know this is so stupid but i was getting food for Christmas, and just in general so i decided to have my own pantry set up. I like the way it looks, and it's also great for when i'm hungry. At the moment in my pantry i have white fudge animal crackers, Triscuits, Lindor chocolate, and some off brand Nutella. 


Last but not least i hung up my 2018 calendar to start the new year off right. I hope you guys enjoyed this post. I know the photos were not so great but i was trying to put together this post last minute for you guys. I will see you guys on Tuesday for another post!


Home Inspiration I'm Feeling Inspired By...

Hey guys today I'm back with another post in my series "At home with Sugarcoatedbears". So I am currently on my way up to the Appalachian mountains for the weekend, and I just thought I would show you guys some home inspiration that I've been feeling inspired by. With the fall season kicking in I'm finding myself looking up home inspiration because It's been cold in my house so I'm looking up winter bed inspiration but then I found myself seeing other cute home ideas. So here is a thread of home decor inspiration that I have actually repined on Pinterest. Also if you don't follow me already on Pinterest you can here or look up me up @sugarcoatedbears on Pinterest. Now let's get into the inspo

Picture Credit
In all of these pictures you will notice some similarities because I have a certain kind of decorating style/interest that if I were to describe it, I would say it's girly, Scandinavian, Parisian, minimal, and inspired by fashion. In this picture above I just love that Paris print on the wall. I see these styles of prints all over pinterest, and Instagram when someone posts photos of their home. It just looks awesome!

I am a total sucker for gallery walls! They look so good, and it really adds a nice sense of self expression to a space. I don't know why I am obsessed with gallery walls so much, I just think they look amazing! A gallery wall is always a good way to spruce up a boring space because a gallery wall is like a giant piece of art. 

I've also been loving the colors pink and grey paired together. It just looks so good, and I don't even know why, it's just pleasing to the eye. You know what's funny is when I upgraded to a queen bed i went straight for the pink bedding and grey pillows as accents. I like a dusty pink color and light grey paired together, but I feel like if the grey and pink shades were darker it just wouldn't look as good. But I don't know.  

I love this cute little nook because it is a good way to store stuff like the stuff shown in the picture. I feel like a lot of interior decorators/designers will have some nice room in a magazine, but then not have human elements included. Like the lived in kind of vibe in a space, that is missing in the magazines. But having stuff on the table or bench will create a more homey vibe, and it will make it look lived in. I really love setting my shoes on the table whether I want to admit it or not, but it's just our natural human instinct to throw our stuff on the table, or put stuff down. 

Here is another picture that is just bedroom goals. I love a nice airy vibe in a room, and bright light shining in through the windows. It's just the nicest feeling ever! I actually never sleep with my blinds closed, my blinds are always open, so I am defiantly a fan of keeping the shades open. But like seriously the bedroom in the picture just looks so amazing! I love the pink and white bedding paired together to give it that crisp open vibe that the space reflects. 

That's all for today's post. I hope I inspired you guys. And you will be seeing pictures of the mountain trip very soon(check my insta story this weekend if you're interested). And I'll see you guys on Tuesday with another blog post. 


I Attempt To Make A Rug


Hello guys! Welcome to the 2nd post in my series "At Home With Sugarcoatedbears". So I'm going to be straight up. When I bought the supplies I needed, I was intending to make a rug, but then turns out I didn't have enough supplies. And I wasn't trying to go to the craft store and waste 20 more bucks because I was short on glue and rope. So I just ended up with a placemat. But I can't complain because now I use the placemat as a cute plant placemat in my room. So in today's tutorial I will show you how I made the "rug" and then you guys can see the epic fail at the end.


For this DIY you will need some rope, a glue gun with some glue, a drop cloth, and some scissors. 


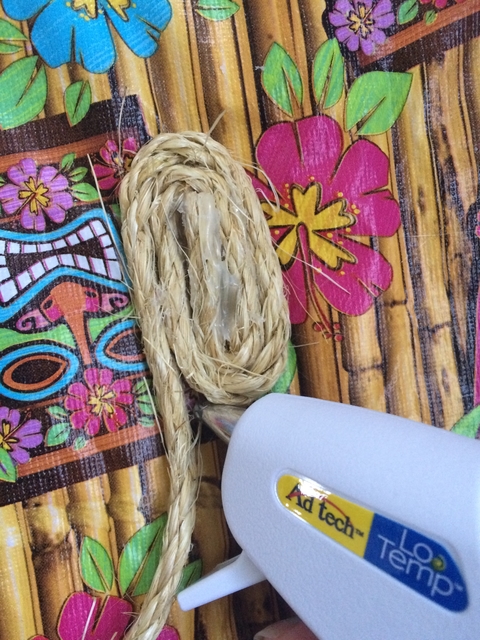
So to start out you will make a little circle kind of wrap and hot glue gun it to your drop cloth. Then just keep wrapping your rope around and keep gluing it down. 


As you keep wrapping you will start to see it turning into a rug or in my case, a placemat. 


This was the part when I ran out of glue so I just decided to call it a day and have it be a placemat. 


Now you just cut the drop cloth around your rug/placemat, and then you got your placemat/rug. 


Now that you have it out you can cut all the stray pieces of the drop cloth out if you can see it hanging loose from the rug/placemat. 


Here is the final product. It didn't turn out how I thought it was, but I still love it! 


It is very happy sitting underneath this plant in my room, and It actually looks really cute! 

So that was all for today's post. I hope you found it entertaining. I epic failed on making the rug, but you live and you learn. I'll see you guys on Wednesday with another post!


How to Paint Your Own Planter

Closeup of planter

Hey guys welcome to the first post of my series "At Home With Sugarcoatedbears". Today I thought I would paint my own planter that I have to hold a basil plant that I got recently. The planter before was just an average planter, just brown in color. But then I had the idea of painting the planter. So here is how I painted my planter, and how you can paint your own planter pretty easily. 

What you need

So for this DIY you're going to need a planter, a cup that you don't mind getting a little grungy(but you can also use anything that holds water pretty much), one piece of palette paper, a big paintbrush, a small paintbrush, and the paint that you want to use. 

Mug

So first go to fill up the water cup that way you can clean your brushes, and such. 

Palette paper

Next lay get a piece of palette paper, and place the paints that you're working with on there. Then after that, start to paint your planter. 

1st coat of planter

This was how my little basil plant looked after one coat of paint. But for this DIY project you will need to do three coats of paint if you're aiming for the look of my planter. It just depends on what kind of look you want. 

3rd coat of planter

So this is how my planter looked after three coats. The coverage is pretty good, and you can't see the old brown color on the outside of it. So now wait for that to dry, and move onto the bottom piece of the planter if your planter has that kind of thing. 

Bottom piece

For the bottom piece I went in for the same white that I used earlier. So I just paint that on, and I only did two layers on this piece because It's not as noticeable, but you can do three to be safe. Then wait for everything to dry so then you can add the extra details if you're doing that. 

Adding small details

Now I'm painting on these black little rectangular polka dots. I painted this near the top of the planter because that was the design I was going for. 

Final product

Then this was the final product. I think it turned out really cute, and kind of boho. I really like it, and it's affordable to make.  

Thanks for tuning into the new series, I can't wait for all the exciting things coming up! I'll see you guys on Friday with another post. 
My social media
Bloglovin

Instagram

Pinterest